Cloudways – Feature Rich Web Hosting for Web Agencies Developers and Designers

Manual installation and configuration of PHP on your server is a time consuming and daunting (for newbies) multi-step process. But thanks to managed hosting solutions available in the market today, setting up a PHP server is no longer a difficult task.
In fact, using Cloudways’ managed hosting solutions, you can deploy a PHP server with your desired resources in minutes! Cloudways offers server infrastructure from five top providers – AWS, DigitalOcean, Vultr, KYUP and Google Compute Engine. The Cloudways PHP PaaS is uniquely optimized for PHP developers!
Cloudways for PHP
Cloudways has its own unique PHP stack called ThunderStack, which consists of unique mix of server and caching technologies that offer the best server performance you can imagine! Cloudways supports all major PHP frameworks including Laravel, Symfony, CodeIgniter and CakePHP, and allows one-click installation of your favorite PHP-based CMS like WordPress and Bolt. For all your external package needs, Cloudways has pre-installed Composer and Git that you can begin using straight away!
Let’s run through the case of setting up PHP 7 on a DigitalOcean server using the Cloudways Platform.
Deploying the Server
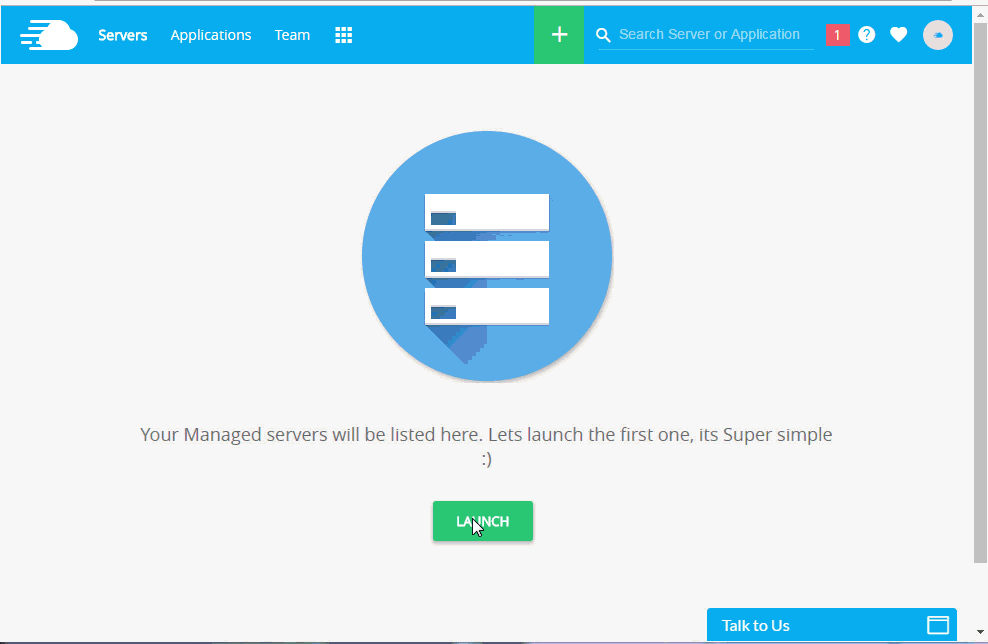
You will see the power of the Cloudways platform right away in the first step! Signing up for your account at Cloudways takes only a few minutes!
To set up PHP 7 server on DigitalOcean at Cloudways, simply sign up for your Cloudways account, and login using your newly acquired login credentials. Next, in the ‘SERVER & APP DETAILS’ section select your PHP stack, DigitalOcean as your infrastructure provider and identify your server resource needs along with other required details. And you’re done! Your Digital Ocean server will now be deployed.
> Use promo code PHP15 to get $15 free credit in cloudways account.

Now after installation, move to Servers->Settings & Packages tab. There are three sub tabs: Basic, Advanced and Packages. In Basic tab, you can set basic PHP attribute values such as Execution limit, Upload Size, Memory Limit and Error Reporting.
In Advance tab, you can set up advance attribute values for Nginx, Apache, MySQL and PHP including Max input variables, Xdebug, Opcache Memory, Max Connection limit,HTTP2. You can simply input the values and use toggles for enabling and disabling options.
In Packages, you can easily downgrade PHP version to 5.6, if your application requires it. In addition, you have a choice of using MySQL or MariaDB as you preferred database driver.

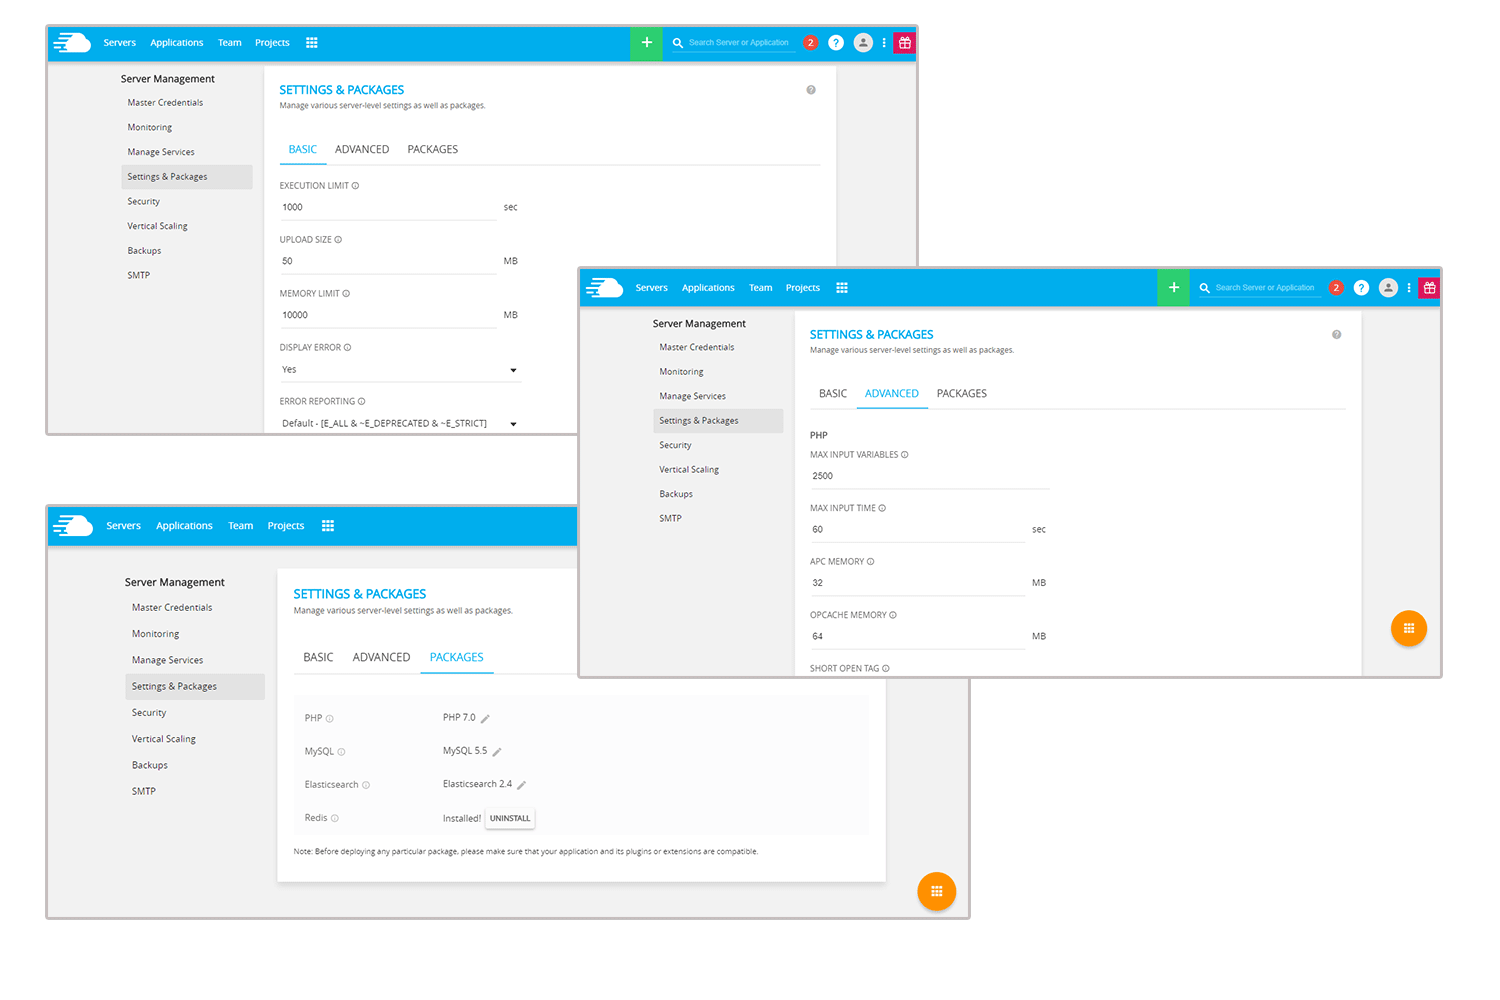
By default, backups are disabled. You can enable them via Backup tab and create backups of the server from 1 hour to 7 days.
Cloudways Custom MySQL Manager
When you work with databases in PHP, you need a database manager. On the Cloudways Platform, you will get a custom built MySQL manager in which you can perform all the tasks of a typical DB manager. The important point to remember at this point is that Cloudways provides one dedicated database with a PHP application. If you want to use more than one databases (say three), launch two new PHP apps and use their databases in your original application.
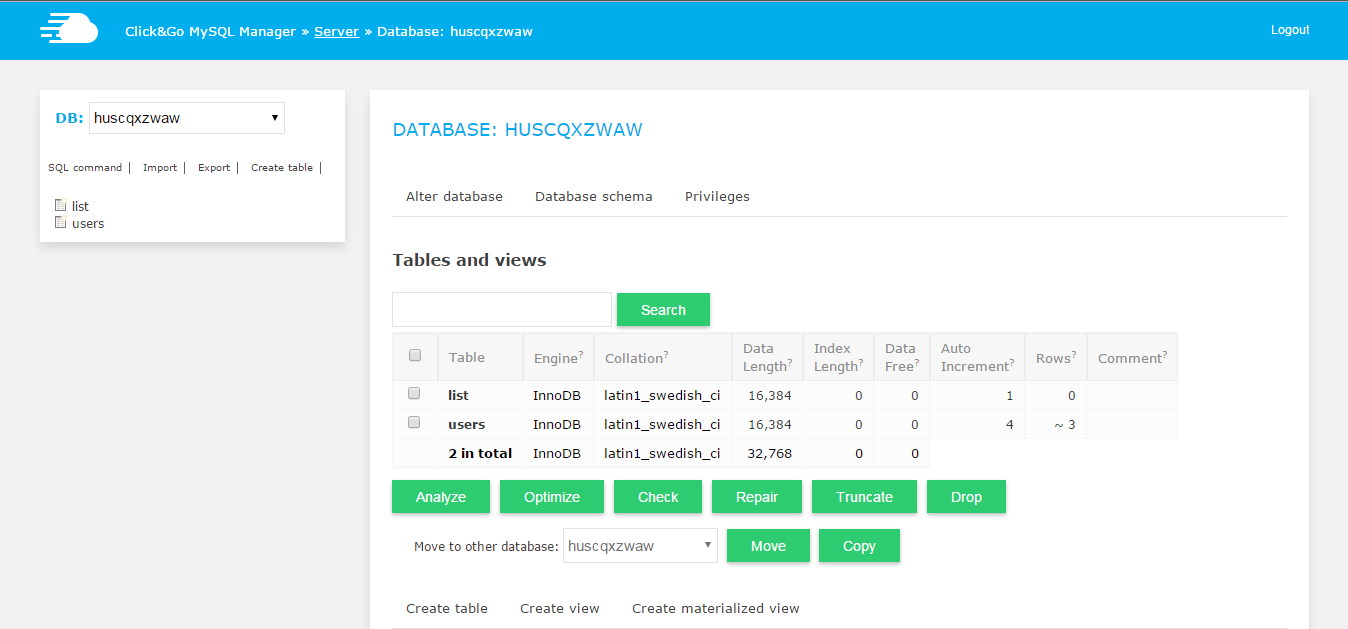
However, if you wish to install and use another database manager like PHPMyadmin, you can easily install it by following this simple guide on installing phpMyAdmin.
Deploying Your PHP App From GitHub
You likely have your PHP application on GitHub. No problem, because you could easily deploy it on the Cloudways Platform. The Platform has a simple system for direct deployment of your application from Git repositories.
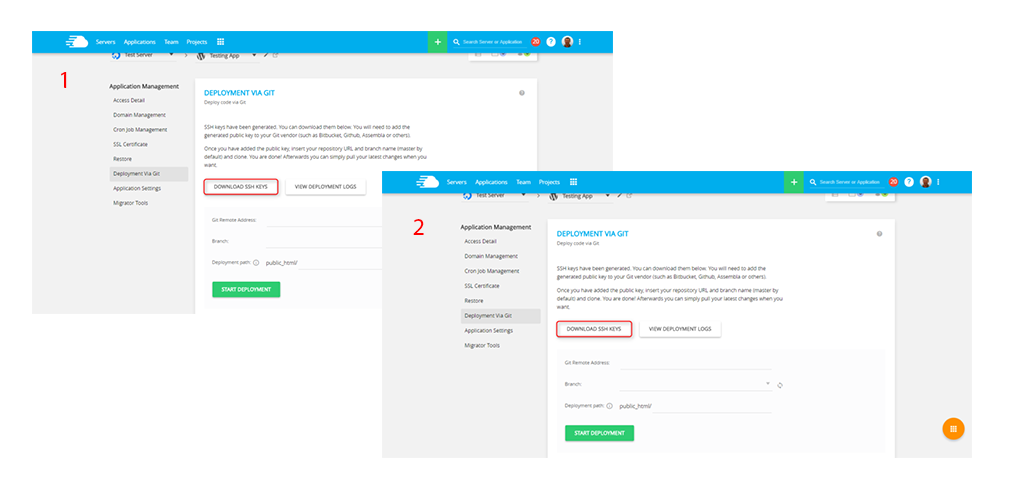
To deploy the application from a Git repo, first, in the Platform dashboard, click the ‘Applications’ tab from the top menu bar and select your application from the list that pops up. You will now need a mechanism to generate and download the SSH keys that form the critical authentication aspect of the process.
To do this, click on the ‘Deployment via Git’ button on the ‘Application Management’ area and then click the ‘Generate SSH Keys’ button to generate your unique SSH key. To download these keys, simply click on ‘Download SSH Keys’.

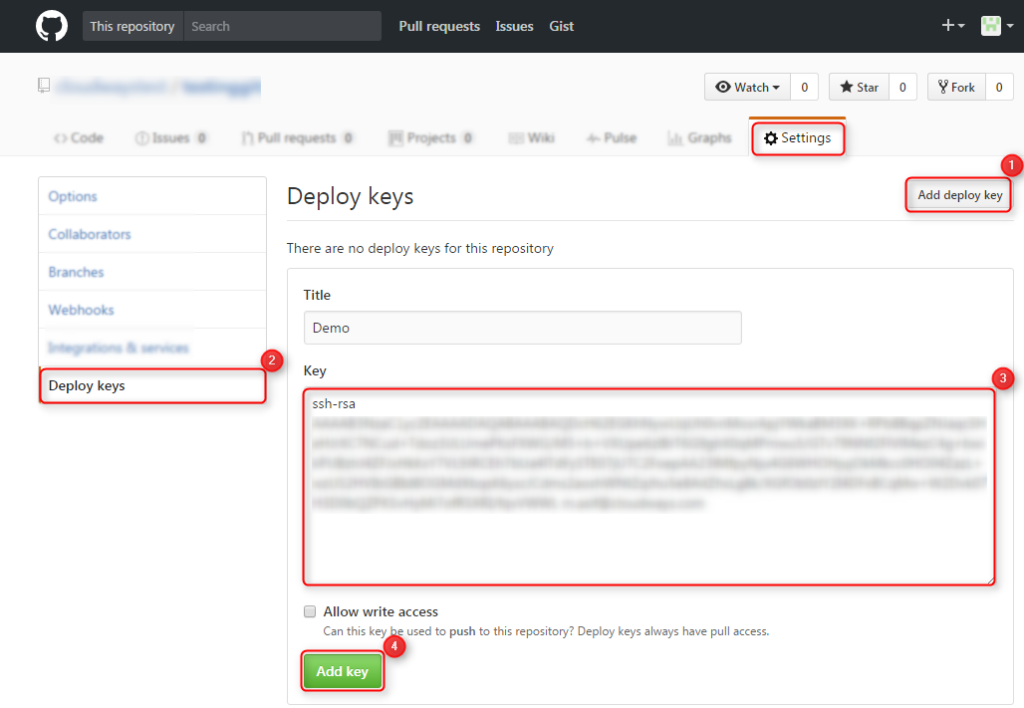
To allow Cloudways to access your application on the Git repository, upload the ‘SSH Public Key’ (that you have just downloaded in the previous step) to the GitHub.
To do this, login to your GitHub account, go to the desired repository, and into the ‘Settings’ tab. Here, locate the ‘Add Deploy Key’ button and use it to add the SSH Public Key. You can do this by opening the file downloaded in the previous step and pasting its content into the space provided by the GitHub. Click on the ‘Add Key’ button to finalize the input of the SSH key.

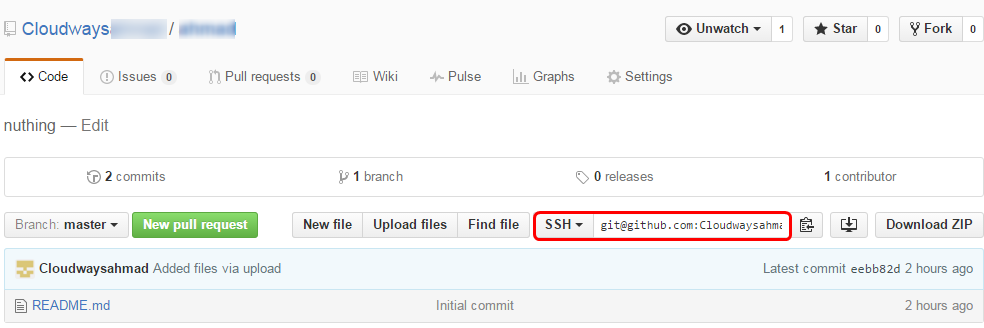
You will also need a path link to allow GitHub to communicate with the Cloudways Platform. This path is provided by the ‘Repository SSH Address’ that you will see in the top panel in your main GitHub dashboard. Copy and paste this address in your Cloudways’ ‘Git Remote Address’ field.

Next you need to input the deployment path and click on ‘Start Deployment’ button to have your application code deployed onto the Cloudways platform!


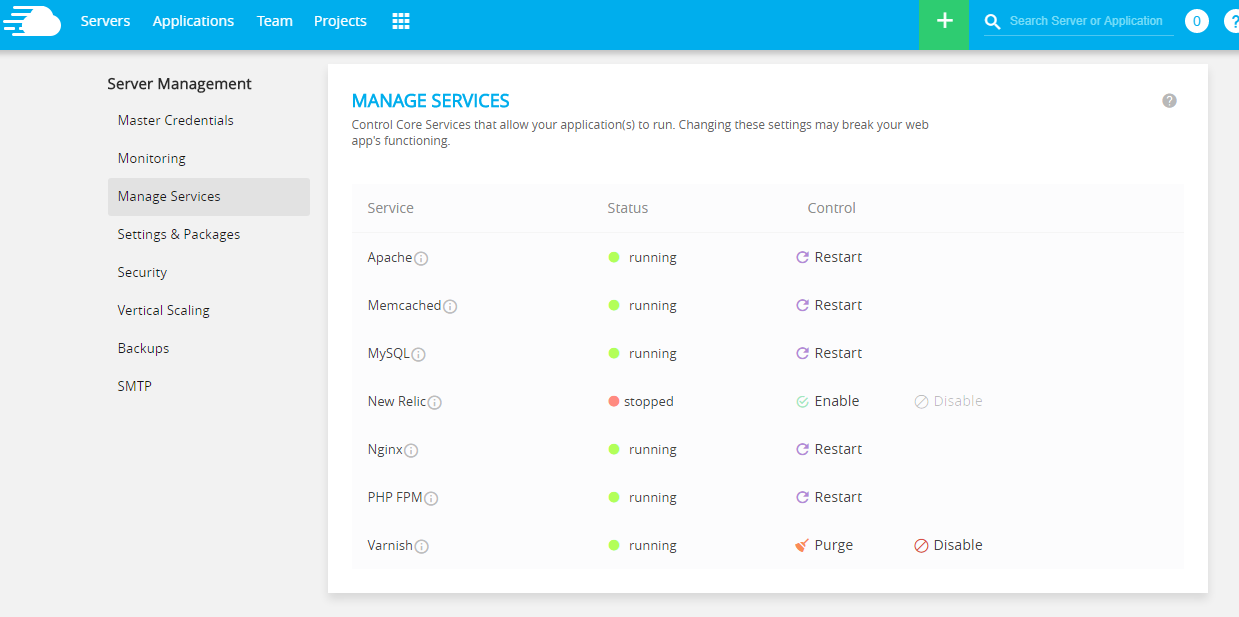
Managing PHP Services on Cloudways
Cloudways allows easy one-click install/uninstall of a host of services for your custom application’s requirements. Here’s a snapshot of the ‘Manage Services’ section listing all the services that Cloudways offers through one-click installation.
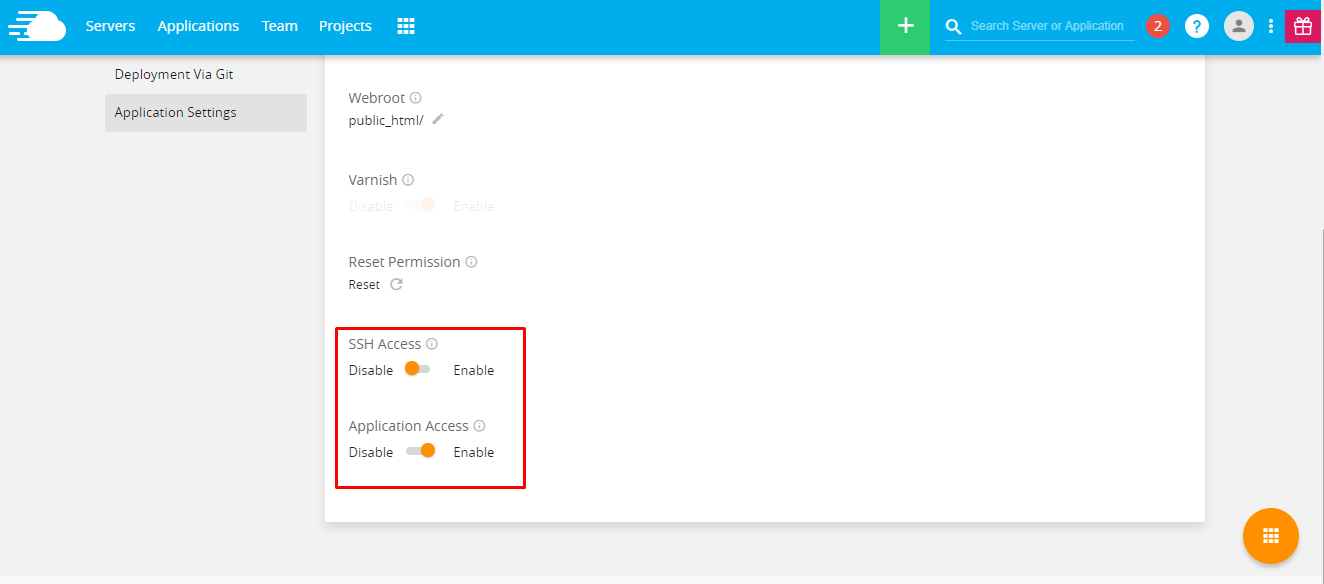
SFTP & Application Level SSH
If you use Linux, you typically use SSH for accessing the server(s) and individual applications. A third-party developer requires application and server level access as per the requirements of the client. Cloudways offers SSH access that could be made available to developer(s) if the need arises. You can also give application level SSH access to the developers so that they will be restricted to the specified app. The great thing is that the SSH access could be enabled/disabled through a simple toggle switch in Application Settings.

Setting Up Cron Jobs on Cloudways
Now let’s see how Cloudways makes setting up the routine cron jobs a breeze.
Within the ‘Application Management’ section of the Cloudways application, you will find the ‘Cron Job Management’ button. Click this button and follow it up with clicking the ‘Add New Cron Job’ button to begin adding a new cron job.
A window should pop up asking you to specify how often the cron job needs to be run. Select a time period from the list or add a custom time period. Next, select the type of script you want to run (PHP, curl, wget) and the specific command that needs to be run. Review the settings and hit the ‘SUBMIT’ button to register the new cron job. You can further utilize the ‘Advanced’ editor tab to use command line switches or toggle other advanced settings for the newly set up cron job.
Setting up SMTP Server on Cloudways
Almost all front-end applications require a simple mail transfer protocol (SMTP) server to manage the crucial task of sending out emails.
Developers often have to restore to setting up code snippets for manually configuring the email setup with the application. However, Cloudways makes the whole process very easy through an easy-to-use frontend option for setting up SMTP. This option is available at the far bottom on the ‘Server Management’ tab of the Cloudways server dashboard.
You can conveniently select either Elastic Email or your own SMTP account (the options include mailgun, mandrill, AuthSmtp, Sendgrid and Gmail). Enter the Host, Port, Username and Password and voila! Your outgoing mail delivery is ready to go.


Creating Custom Apps with Cloudways API
Recently, Cloudways has revealed the platform API that is a great option for creating custom applications to handle Cloudways servers and apps operations. You can find many use cases here. The API can be used for building reseller focused applications, similar to this Cloudways white label in Laravel in which I have created servers and applications from a custom app.
Agency Friendly Hosting Solution
Cloudways provides an ideal hosting solution for agencies that manage the accounts of multiple clients. Developers, QAs and other resources can be added as Team members. This addition comes with restriction to individual applications and with specific roles. Once a project has been finished, the agency could hand over the project’s server to the client’s Cloudways account easily through the Server Transfer feature. To ensure security across multiple subdomains, a single Let’s Encrypt SSL certificate is applicable across all subdomains. The CloudwaysBot ensures that the agency has the complete information about server performance. CloudwaysBot sends almost-realtime server information through Slack, email and other predefined communication channels.
Conclusion
As you can see from the above points, Cloudways allows you to easily handle some of the most important hosting and PHP application management tasks. From setting up your server and server resources initially, deploying your application, to managing backend application tasks, everything is a breeze with Cloudways!
Click HERE to get started with Cloudways right away!
Join over 50,000 developers, designers and entrepreneurs!
Get exclusive articles, special deals and freebies delivered straight to your email inbox!